MVVM Design Pattern with Combine framework on iOS
December 4, 2019
#swift
#combine
The UI architectural design patterns and best practices used to organise iOS code into logical components evolved over the last years. Most of the times developers prefer to avoid the Model View Controller (MVC) pattern in favour of cleaner, modular and more testable patterns. You might be already familiar with MVP, MVVM, VIPER, MVI, etc. Like any tool, all of them have pros and cons and should be used on a case by case basis.
In this article, I’ll show how to build an iOS application that follows MVVM Design Pattern and uses Combine framework under the hood.
What is MVVM?
Model-View-ViewModel (MVVM) is a UI architectural design pattern that decouples UI code from the business and presentation logic of an application. As it comes from the name, MVVM divides an application into three components to help separate the code: the model, the view, and the view model. Let’s discuss the purpose of each of those.
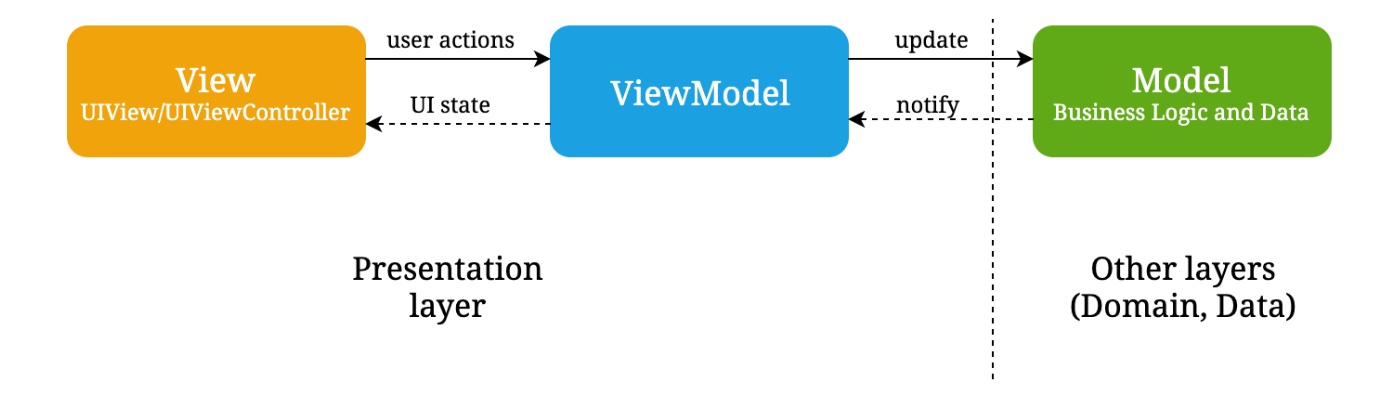
- The View defines the layout, appearance and structure of the UI. The view informs the ViewModel about user interactions and observables state changes exposed by the viewModel.
- The ViewModel is responsible for wrapping the model and providing state to the UI components. It also defines actions, that can be used by the view to pass events to the model. However, it shouldn’t have access to the view.
- The Model defines core types and implements application business logic. It is completely independent of the view and view-model and reusable in many across the application.
Implementation
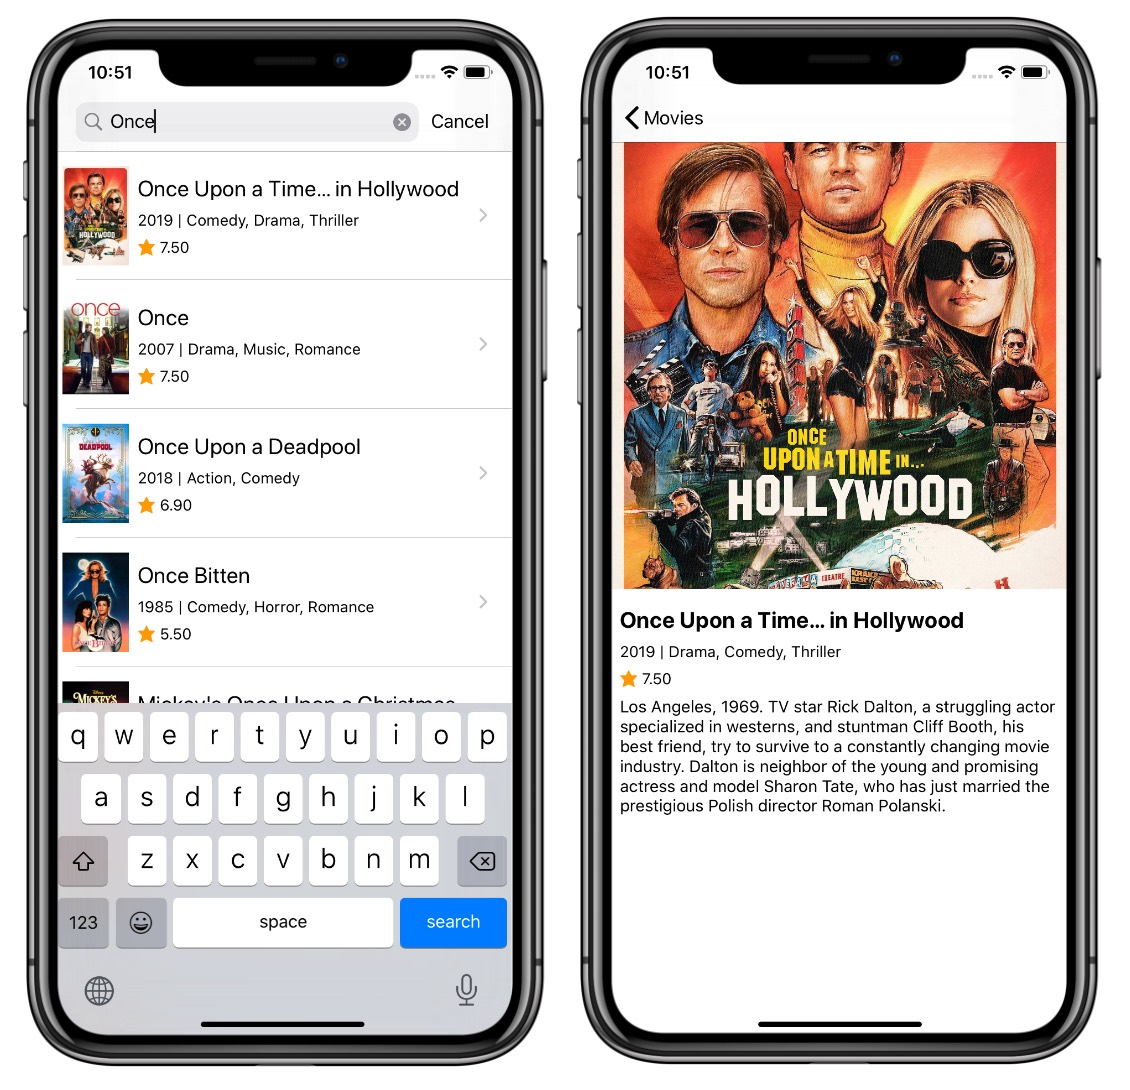
Let’s dive into details and have a look at how can we implement an application that follows this pattern. We’ll create an iOS application that uses TMDb API to search a movie and show the details.
As with any design pattern, there are many ways to implement MVVM in Swift. In this article, I’ll follow the SOLID design principles and keep the focus on having clean, maintainable and testable code.
Model
As it was mentioned above, the model layer consists of the model objects and use cases that encapsulate the data and behavior of the application. The use cases are typically utilized in conjunction with services that contain data access and caching. Taking it all into account, we can declare the MoviesUseCaseType protocol:
protocol MoviesUseCaseType {

    // Runs movies search with a query string
    func searchMovies(with name: String) -> AnyPublisher<Result<[Movie], Error>, Never>

    // Fetches details for movie with specified id
    func movieDetails(with id: Int) -> AnyPublisher<Result<Movie, Error>, Never>

    // Loads image for the given movie
    func loadImage(for movie: Movie, size: ImageSize) -> AnyPublisher<UIImage?, Never>
}
As you can see, the protocol functions are quite straight-forward. All of them return a type-erasing publisher, that can deliver a sequence of values over time. We’re now ready to implement the MoviesUseCase class:
final class MoviesUseCase {

    private let networkService: NetworkServiceType
    private let imageLoaderService: ImageLoaderServiceType

    init(networkService: NetworkServiceType, imageLoaderService: ImageLoaderServiceType) {
        self.networkService = networkService
        self.imageLoaderService = imageLoaderService
    }
}
The MoviesUseCase class consumes network and image loader service via initializer. Those are responsible for fetching data via network and image loading and caching. The searchMovies function could be implemented as following using Combine framework:
extension MoviesUseCase: MoviesUseCaseType {
    func searchMovies(with name: String) -> AnyPublisher<Result<[Movie], Error>, Never> {
        return networkService
            .load(Resource<Movies>.movies(query: name)) ➊
            .map({ (result: Result<Movies, NetworkError>) -> Result<[Movie], Error> in ➋
                switch result {
                case .success(let movies): return .success(movies.items)
                case .failure(let error): return .failure(error)
                }
            })
            .subscribe(on: Scheduler.backgroundWorkScheduler) ➌
            .receive(on: Scheduler.mainScheduler) ➍
            .eraseToAnyPublisher() ➎
    }
}
➊ load creates a publisher that delivers the results of performing URL session data tasks. It returns down the pipeline Result<Movies, NetworkError> object.
➋ The map operator is used to transform the result object.
➌ Performs the work on the background queue.
➍ Switches to receive the result on the main queue.
➎ eraseToAnyPublisher does type erasure on the chain of operators so the searchMovies(with:) function returns an object of type AnyPublisher<Result<[Movie], Error>, Never>.
ViewModel
With the above-mentioned code in place, we’re now ready to declare viewModel for the search screen. You might consider several options at this point. It should be a nice idea to expose @Published properties in the viewModel and observe changes from the view. A better solution would be defining a ViewModel, that transforms the input to the output:
protocol MoviesSearchViewModelType {
    func transform(input: MoviesSearchViewModelInput) -> MoviesSearchViewModelOuput
}
Where MoviesSearchViewModelInput is a struct that defines UI events to be used by the viewModel:
struct MoviesSearchViewModelInput {
    // called when a screen becomes visible
    let appear: AnyPublisher<Void, Never>
    // triggered when a search query is updated
    let search: AnyPublisher<String, Never>
    // called when a user selected an item from the list
    let selection: AnyPublisher<Int, Never>
}
And MoviesSearchViewModelOuput defines the view’s state via the type-erasing publisher:
typealias MoviesSearchViewModelOuput = AnyPublisher<MoviesSearchState, Never>

enum MoviesSearchState {
    case idle
    case loading
    case success([MovieViewModel])
    case noResults
    case failure(Error)
}
It should be pointed out that you could have more complex output type in a real project. It can be declared as a struct then.
Next, we have to declare the MoviesSearchViewModel class. It is initialized with MoviesUseCaseType and MoviesSearchNavigator objects, that define movies search business rules and screens navigation respectively.
final class MoviesSearchViewModel: MoviesSearchViewModelType {

    private weak var navigator: MoviesSearchNavigator?
    private let useCase: MoviesUseCaseType
    private var cancellables: [AnyCancellable] = []

    init(useCase: MoviesUseCaseType, navigator: MoviesSearchNavigator) {
        self.useCase = useCase
        self.navigator = navigator
    }
}
We’re now ready to implement the transform function. This is the most important and probably complex part of our project:
extension MoviesSearchViewModel: MoviesSearchViewModelType {
    func transform(input: MoviesSearchViewModelInput) -> MoviesSearchViewModelOuput {
        cancellables.forEach { $0.cancel() } ➊
        cancellables.removeAll()

        input.selection
            .sink(receiveValue: { [unowned self] movieId in self.navigator?.showDetails(forMovie: movieId) })
            .store(in: &cancellables) ➋

        let searchInput = input.search
            .debounce(for: .milliseconds(300), scheduler: Scheduler.mainScheduler)
            .removeDuplicates() ➌
        let movies = searchInput
            .filter({ !$0.isEmpty })
            .flatMapLatest({[unowned self] query in self.useCase.searchMovies(with: query) })
            .map({ result -> MoviesSearchState in
                switch result {
                    case .success([]): return .noResults
                    case .success(let movies): return .success(self.viewModels(from: movies))
                    case .failure(let error): return .failure(error)
                }
            })
            .eraseToAnyPublisher() ➍

        let initialState: MoviesSearchViewModelOuput = .just(.idle)
        let emptySearchString: MoviesSearchViewModelOuput = searchInput.filter({ $0.isEmpty }).map({ _ in .idle }).eraseToAnyPublisher()
        let idle: MoviesSearchViewModelOuput = Publishers.Merge(initialState, emptySearchString).eraseToAnyPublisher() ➎

        return Publishers.Merge(idle, movies).removeDuplicates().eraseToAnyPublisher() ➏
    }
}
➊ Cancels current subscriptions.
➋ Adds a subscriber to show the details screen when a user taps on a movie from the list.
➌ Debounces search events and removes duplicates to create the searchInput object.
➍ The creation of the movies publisher, that starts search on user input and emits MoviesSearchState objects eventually.
➎ Defines idle state publisher, that emits value immediately(default state) and when the search string is empty.
➏ Merges idle and movies state publishers. Calls eraseToAnyPublisher that does type erasure on the chain of operators so the transform(input:) function returns an object of type AnyPublisher<MoviesSearchState, Never>.
View
Using the above setup we can implement the MoviesSearchViewController. It consumes a MoviesSearchViewModelType instance via initializer and binds one on viewDidLoad:
class MoviesSearchViewController : UIViewController {
    init(viewModel: MoviesSearchViewModelType) {
        self.viewModel = viewModel
        super.init(nibName: nil, bundle: nil)
    }

    override func viewDidLoad() {
        super.viewDidLoad()
        configureUI()
        bind(to: viewModel)
    }
}
Next, we need a way to declare UI events. This could be achieved with PassthroughSubject type, that provides a convenient way to adapt existing imperative code to the Combine model:
extension MoviesSearchViewController {

    private let selection = PassthroughSubject<Int, Never>()
    private let search = PassthroughSubject<String, Never>()
    private let appear = PassthroughSubject<Void, Never>()

    override func viewDidAppear(_ animated: Bool) {
        super.viewDidAppear(animated)
        appear.send(())
    }
}

extension MoviesSearchViewController: UISearchBarDelegate {
    func searchBar(_ searchBar: UISearchBar, textDidChange searchText: String) {
        search.send(searchText)
    }
}

extension MoviesSearchViewController: UITableViewDelegate {

    func tableView(_ tableView: UITableView, didSelectRowAt indexPath: IndexPath) {
        let snapshot = dataSource.snapshot()
        selection.send(snapshot.itemIdentifiers[indexPath.row].id)
    }
}
We can use these events to declare the bind function which is called from viewDidLoad. It establishes a binding with the viewModel, subscribes on the output(state) changes and renders one when changed:
extension MoviesSearchViewController {
    private func bind(to viewModel: MoviesSearchViewModelType) {
        cancellables.forEach { $0.cancel() }
        cancellables.removeAll()
        let input = MoviesSearchViewModelInput(appear: appear.eraseToAnyPublisher()
                                               search: search.eraseToAnyPublisher(),
                                               selection: selection.eraseToAnyPublisher())

        let output = viewModel.transform(input: input)

        output.sink(receiveValue: {[unowned self] state in
            self.render(state)
        }).store(in: &cancellables)
    }
}
Just like that, we’ve created the movies search screen that follows MVVM software design pattern and is built with Combine framework.

Conclusion
The Model-View-ViewModel pattern helps to neatly separate the application logic and UI. It results in having single-purpose components that are easier to test, maintain, and evolve. MVVM works greatly in conjunction with functional reactive frameworks like Combine, that encourage you to write clean, readable code.
You can find the project’s source code on Github. Feel free to play around and reach me out on Twitter if you have any questions, suggestions or feedback.
Thanks for reading!