Colorizing images with CoreML
May 5, 2021
#swift
#coreml
Image colorization for a while has been a tedious process that is done by hand in Photoshop. It can take up to one month to colorize a single picture manually, but luckily we can automate it and achieve realistic results with machine learning.
In today’s article let’s check how image colorization can be automated using machine learning and build iOS application that colorizes grayscale images using CoreML.
Pre-requisites
It should be pointed out that this article requires some Python and Machine Learning knowledge. If this domain is completely new for you, I’d suggest reading Beginning Machine Learning with Keras & Core ML article by Audrey Tam to get familiar with deep learning and its terminology.
Image colorization with Convolutional Neural Networks (CNNs)
Automated image colorization has been a subject of machine learning and computer vision researches for a while. It has various practical applications ranging from image restoration to video colorization. You might have seen Emil Wallner’s article about colorizing black & white photos with just 100 lines of code or DeOldify project on GitHub. Most of these projects are based on Convolutional Neural Networks (CNNs) and involve training a machine learning model on a large number of images.
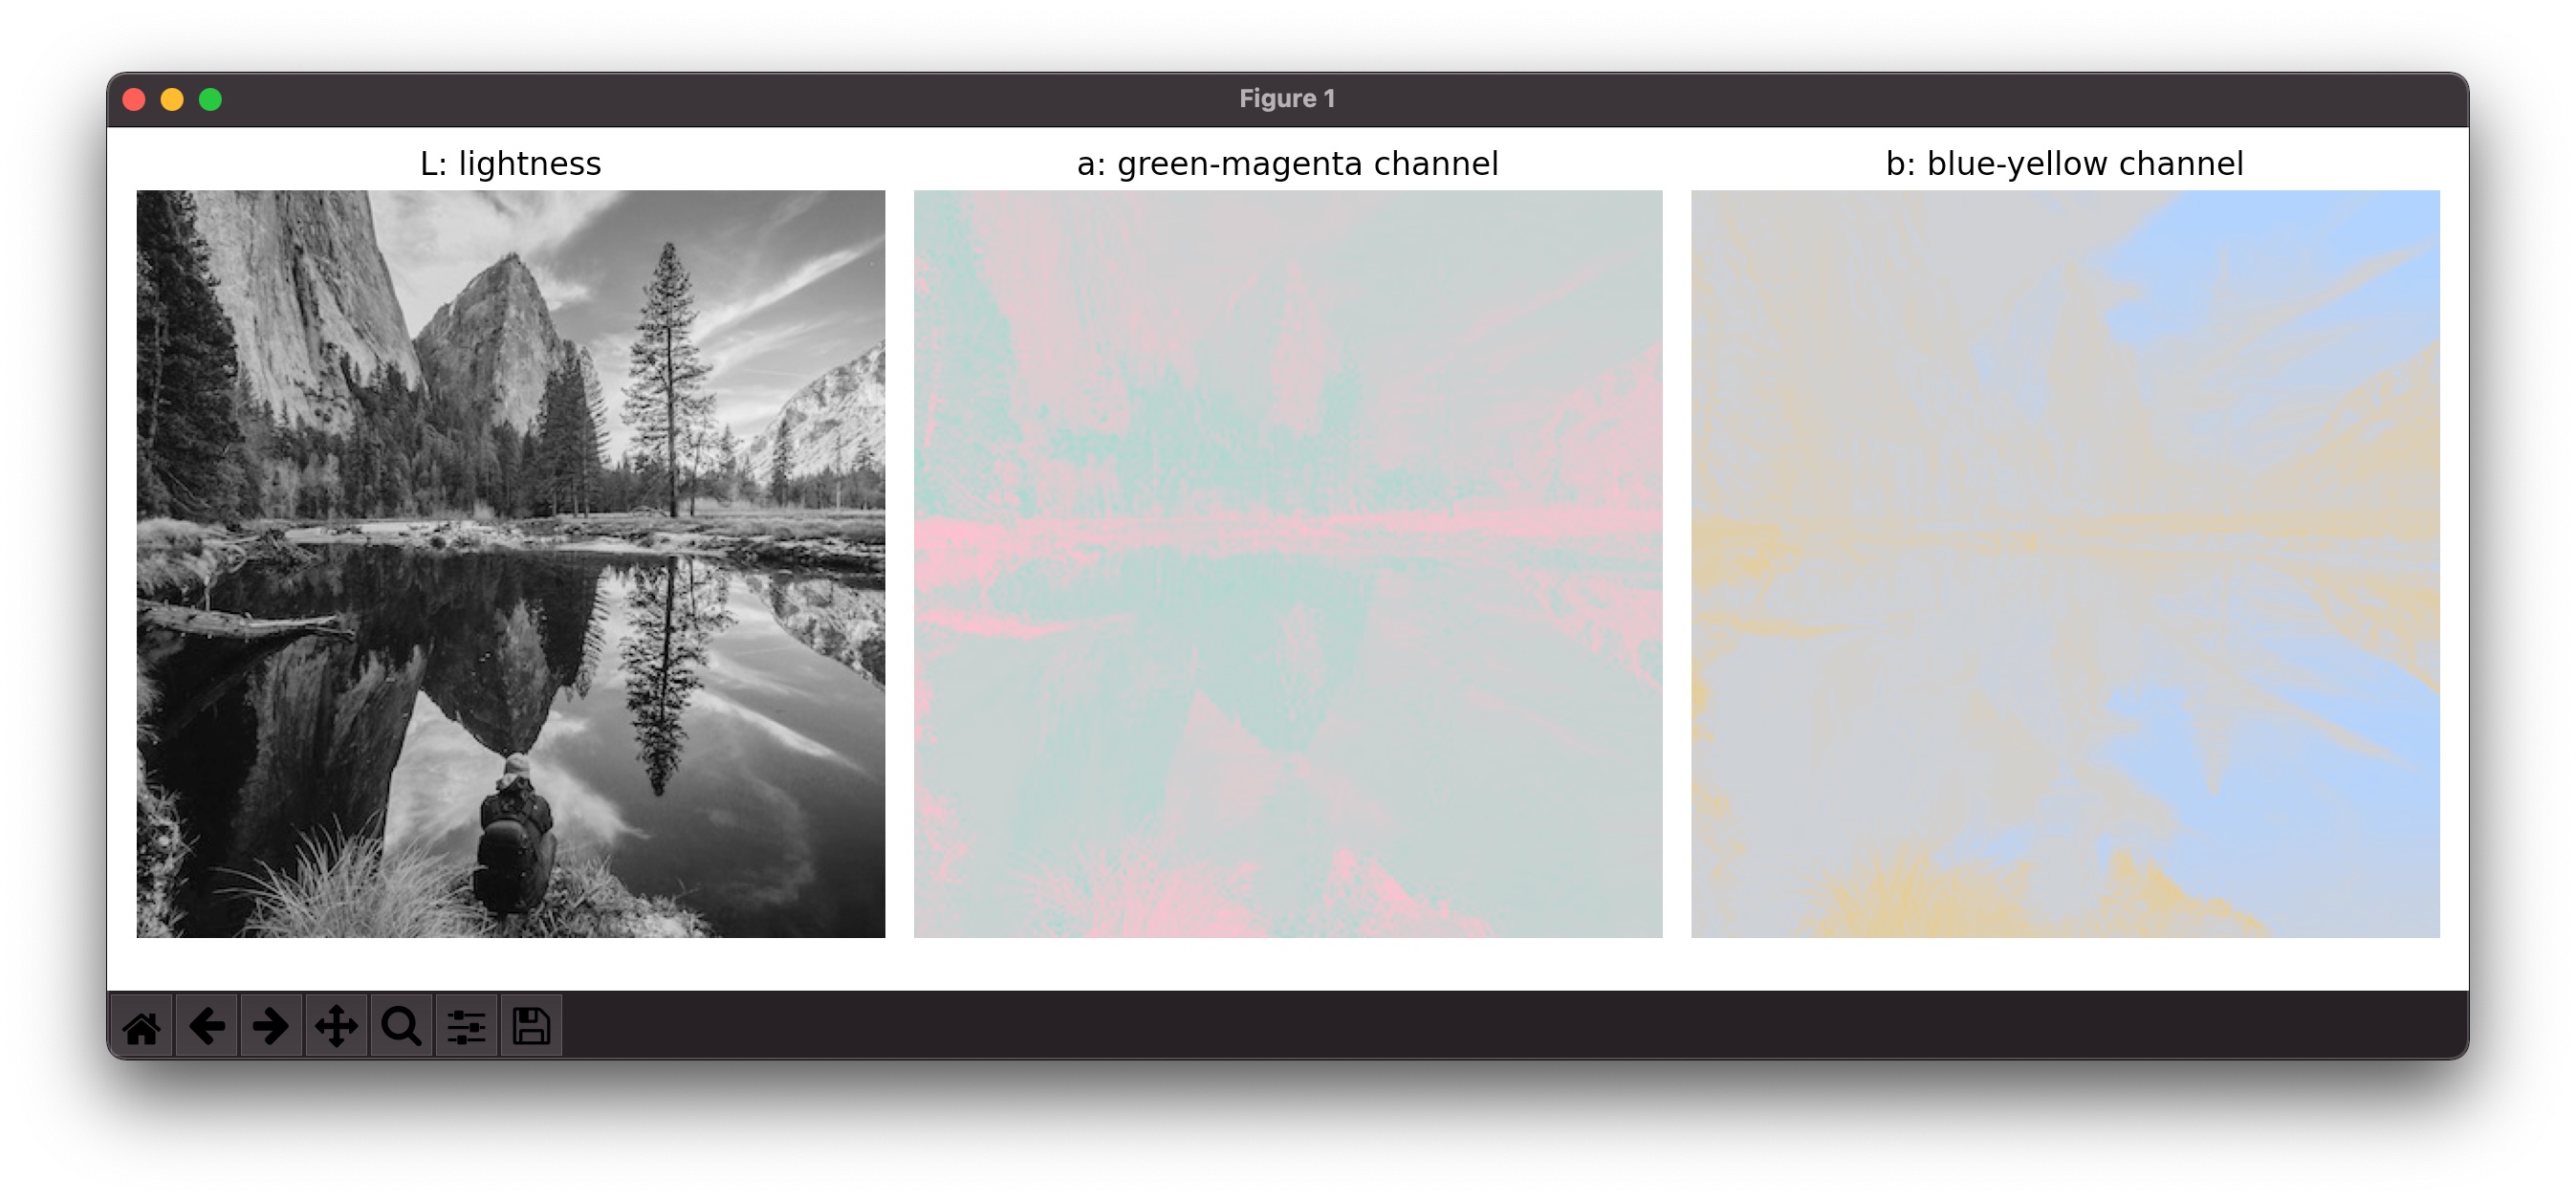
In this article we’ll be working with images in Lab colorspace where L stands for lightness and a and b for green-magenta and blue-yellow channels. We’ll train our model to predict a and b channels from the lightness channel(input). Eventually, we’ll recombine the model’s output(a and b channels) and the lightness channel to create the final result.
Now let’s have a look at a very basic architecture of the image colorization model. The model is formed by a stack of layers which define a relationship between input and output.
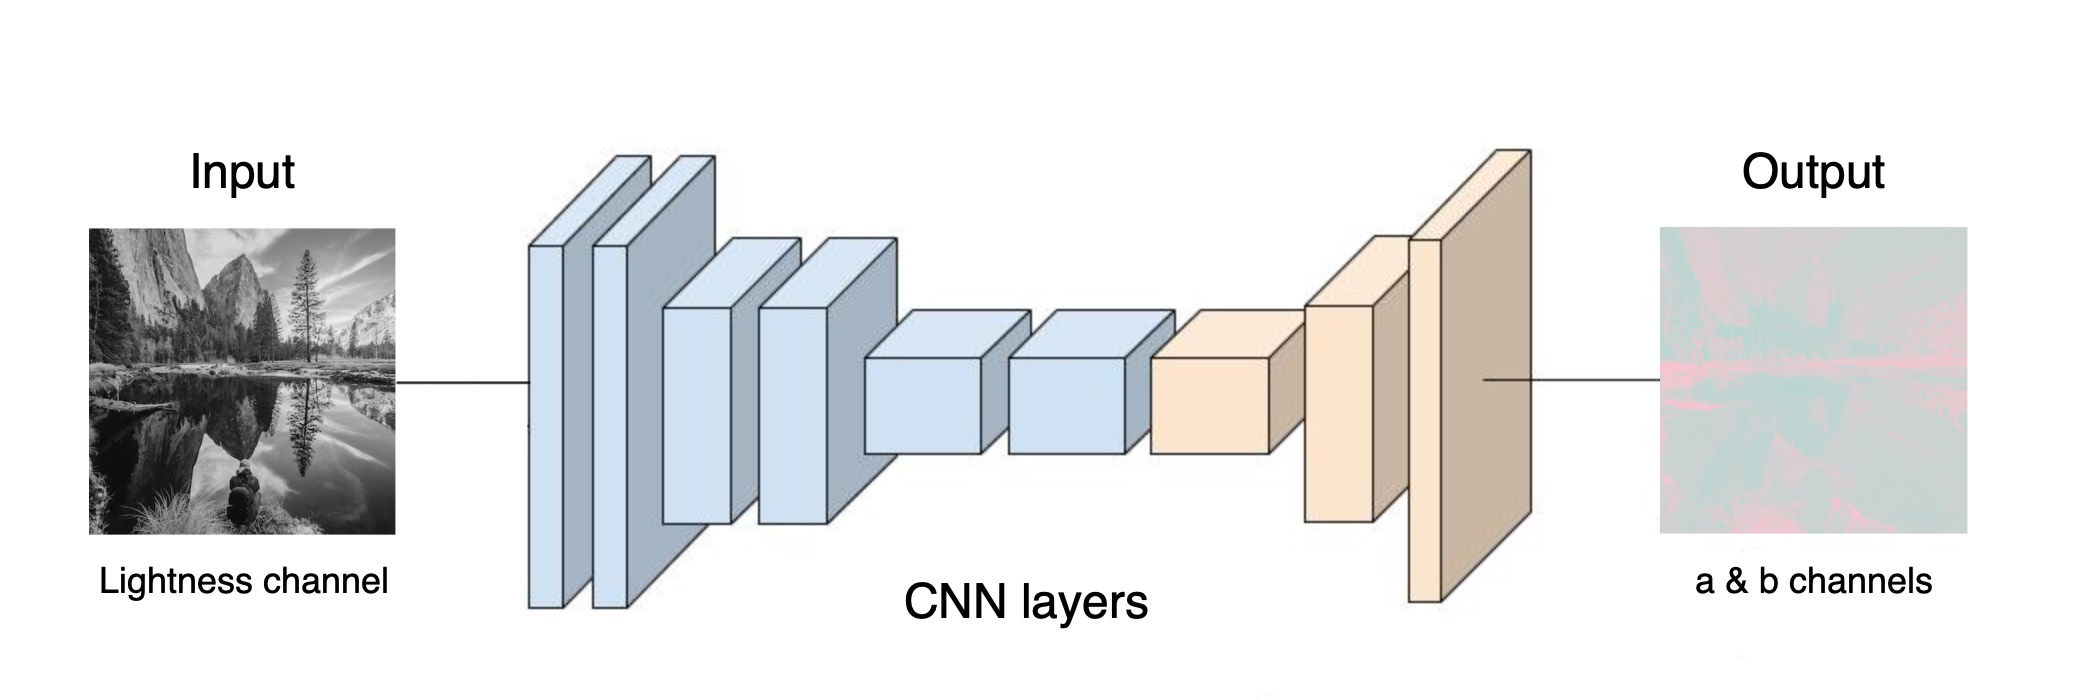
It should be mentioned that automatic colorization is an ambiguous problem where a single image can be colorized in several different ways. Of course, there could be certain failure cases. Therefore our goal would be to produce a plausible colorization and not necessarily recovering the actual ground truth color.
Proof of Concept
Let’s start with creating a simple neural network model to colorize an image. Building a neural network model using TensorFlow, PyTorch or Caffe libraries involves lots of complex code like arrays and matrices manipulations. The better option would be using Keras that provides an easy-to-use deep learning API.
First we should come up with the model architecture. Instead of defining one from scratch, let’s reuse the architecture described by Emil Wallner in his article.
def create_model():
    model = Sequential()
    model.add(InputLayer(input_shape=(400, 400, 1)))
    model.add(Conv2D(8, (3, 3), activation='relu', padding='same', strides=2))
    model.add(Conv2D(8, (3, 3), activation='relu', padding='same'))
    model.add(Conv2D(16, (3, 3), activation='relu', padding='same'))
    model.add(Conv2D(16, (3, 3), activation='relu', padding='same', strides=2))
    model.add(Conv2D(32, (3, 3), activation='relu', padding='same'))
    model.add(Conv2D(32, (3, 3), activation='relu', padding='same', strides=2))
    model.add(UpSampling2D((2, 2)))
    model.add(Conv2D(32, (3, 3), activation='relu', padding='same'))
    model.add(UpSampling2D((2, 2)))
    model.add(Conv2D(16, (3, 3), activation='relu', padding='same'))
    model.add(UpSampling2D((2, 2)))
    model.add(Conv2D(2, (3, 3), activation='tanh', padding='same'))
    model.compile(optimizer='rmsprop', loss='mse')
    return model
Next, we’ll train and test the network on a single image of size 400 x 400. It is done for the sake of simplicity, but later on we’ll be using a model that is trained and validated on a proper dataset.
def train_model(image_name, model):
    image = img_to_array(load_img(image_name))
    image = np.array(image, dtype=np.float32)

    X = rgb2lab(1.0/255*image)[:, :, 0]
    Y = rgb2lab(1.0/255*image)[:, :, 1:]
    Y /= 128
    X = X.reshape(1, 400, 400, 1)
    Y = Y.reshape(1, 400, 400, 2)

    model.fit(x=X,
              y=Y,
              batch_size=1,
              epochs=1000)
Then we should convert our Keras model to the Core ML format with coremltools.
def convert_model(model):
    model.save('tf_keras_model')
    mlmodel = ct.convert('tf_keras_model')
    mlmodel.save("model_alpha.mlmodel")
Now we can colorize the test image using the CoreML model from the previous step.
def colorize(image_name):
    image = img_to_array(load_img(image_name))
    image = np.array(image, dtype=np.float32)
    X = rgb2lab(1.0/255*image)[:, :, 0]
    X = X.reshape(1, 400, 400, 1)

    model = ct.models.MLModel('model_alpha.mlmodel')
    input = np.zeros((1, 400, 400))
    input[0] = X[0][:, :, 0]
    output = model.predict({'input_1': X})["Identity"]
    output *= 128

    # Create & save output
    output_lab = np.zeros((400, 400, 3))
    output_lab[:, :, 0] = X[0][:, :, 0]
    output_lab[:, :, 1] = output[0][:, :, 0]
    output_lab[:, :, 2] = output[0][:, :, 1]

    output_rgb = lab2rgb(output_lab)
    imsave("output.jpg", output_rgb)
Finally, we’ve built our proof of concept and colorized the test image leveraging the CoreML model.
Full version
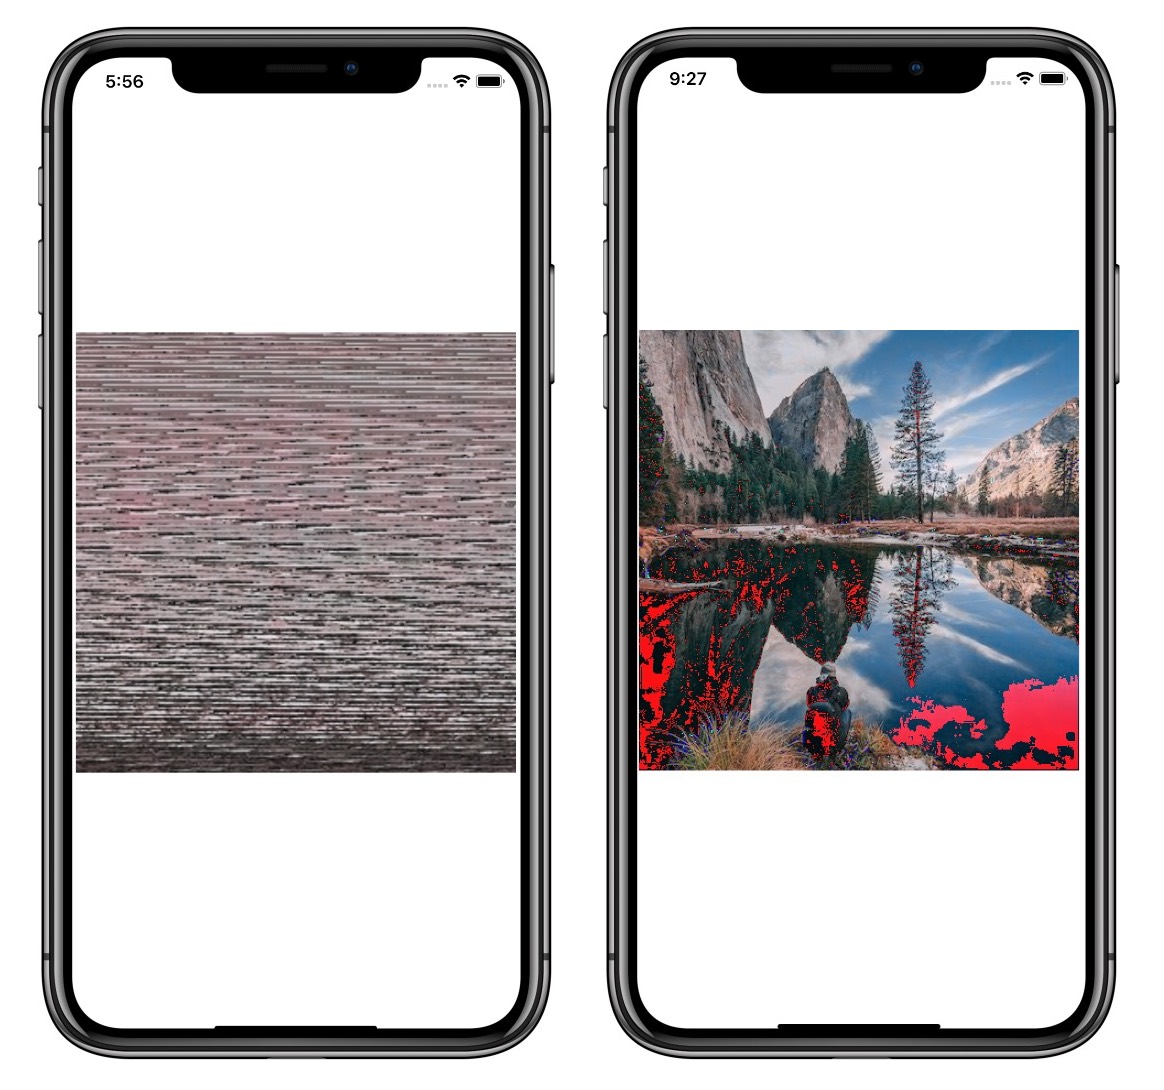
As you might notice, our PoC works nicely on the test image. But it will produce a poor result if we’ll try coloring an image it has not been trained on. It can be improved by using extensive training, validation and test datasets for our model. We can save time by using a model that was trained using hundred of thousand of photos.
In this article, we’ll use a model created by Richard Zhang, Phillip Isola, Alexei A. Efros. It is trained on over a million color images and successfully fools humans on 32% of trials to choose between a generated and ground truth color image.
They are using PyTorch library in their work. The first thing we should do is to convert the model into Core ML format (.mlmodel).
from colorizers import *
import coremltools as ct
import torch

siggraph17_model = siggraph17(pretrained=True).eval() # ➊

example_input = torch.rand(1, 1, 256, 256)
traced_model = torch.jit.trace(siggraph17_model, example_input) # ➋

coreml_model = ct.convert(
    traced_model,
    inputs=[ct.TensorType(name="input1", shape=(1, 1, 256, 256))]
)
coreml_model.save("coremlColorizer.mlmodel") # ➌
➊ Load a pre-trained model and set the model to evaluation mode.
➋ Trace with random data.
➌ Convert to Core ML using coremltools.
Next, let’s test the resulting CoreML model, predict and show results.
colorizer_coreml = ct.models.MLModel('coremlColorizer.mlmodel') # ➊

img = load_img(opt.img_path)
(tens_l_orig, tens_l_rs) = preprocess_img(img, HW=(256,256)) # ➋

tens_ab_rs = colorizer_coreml.predict({'input1': tens_l_rs.numpy()})['796'] # ➌

# ➍
img_bw = postprocess_tens(tens_l_orig, torch.cat((0*tens_l_orig,0*tens_l_orig),dim=1))
out_img_coreml = postprocess_tens(tens_l_orig, torch.from_numpy(tens_ab_rs))
➊ Load the colorizer model.
➋ Resize an image to 256x256, save L channel in both original (“orig”) and resized (“rs”) resolutions.
➌ Predict a & b channels.
➍ Post-process the output: resize to the original size, concatenate ab with L channel.
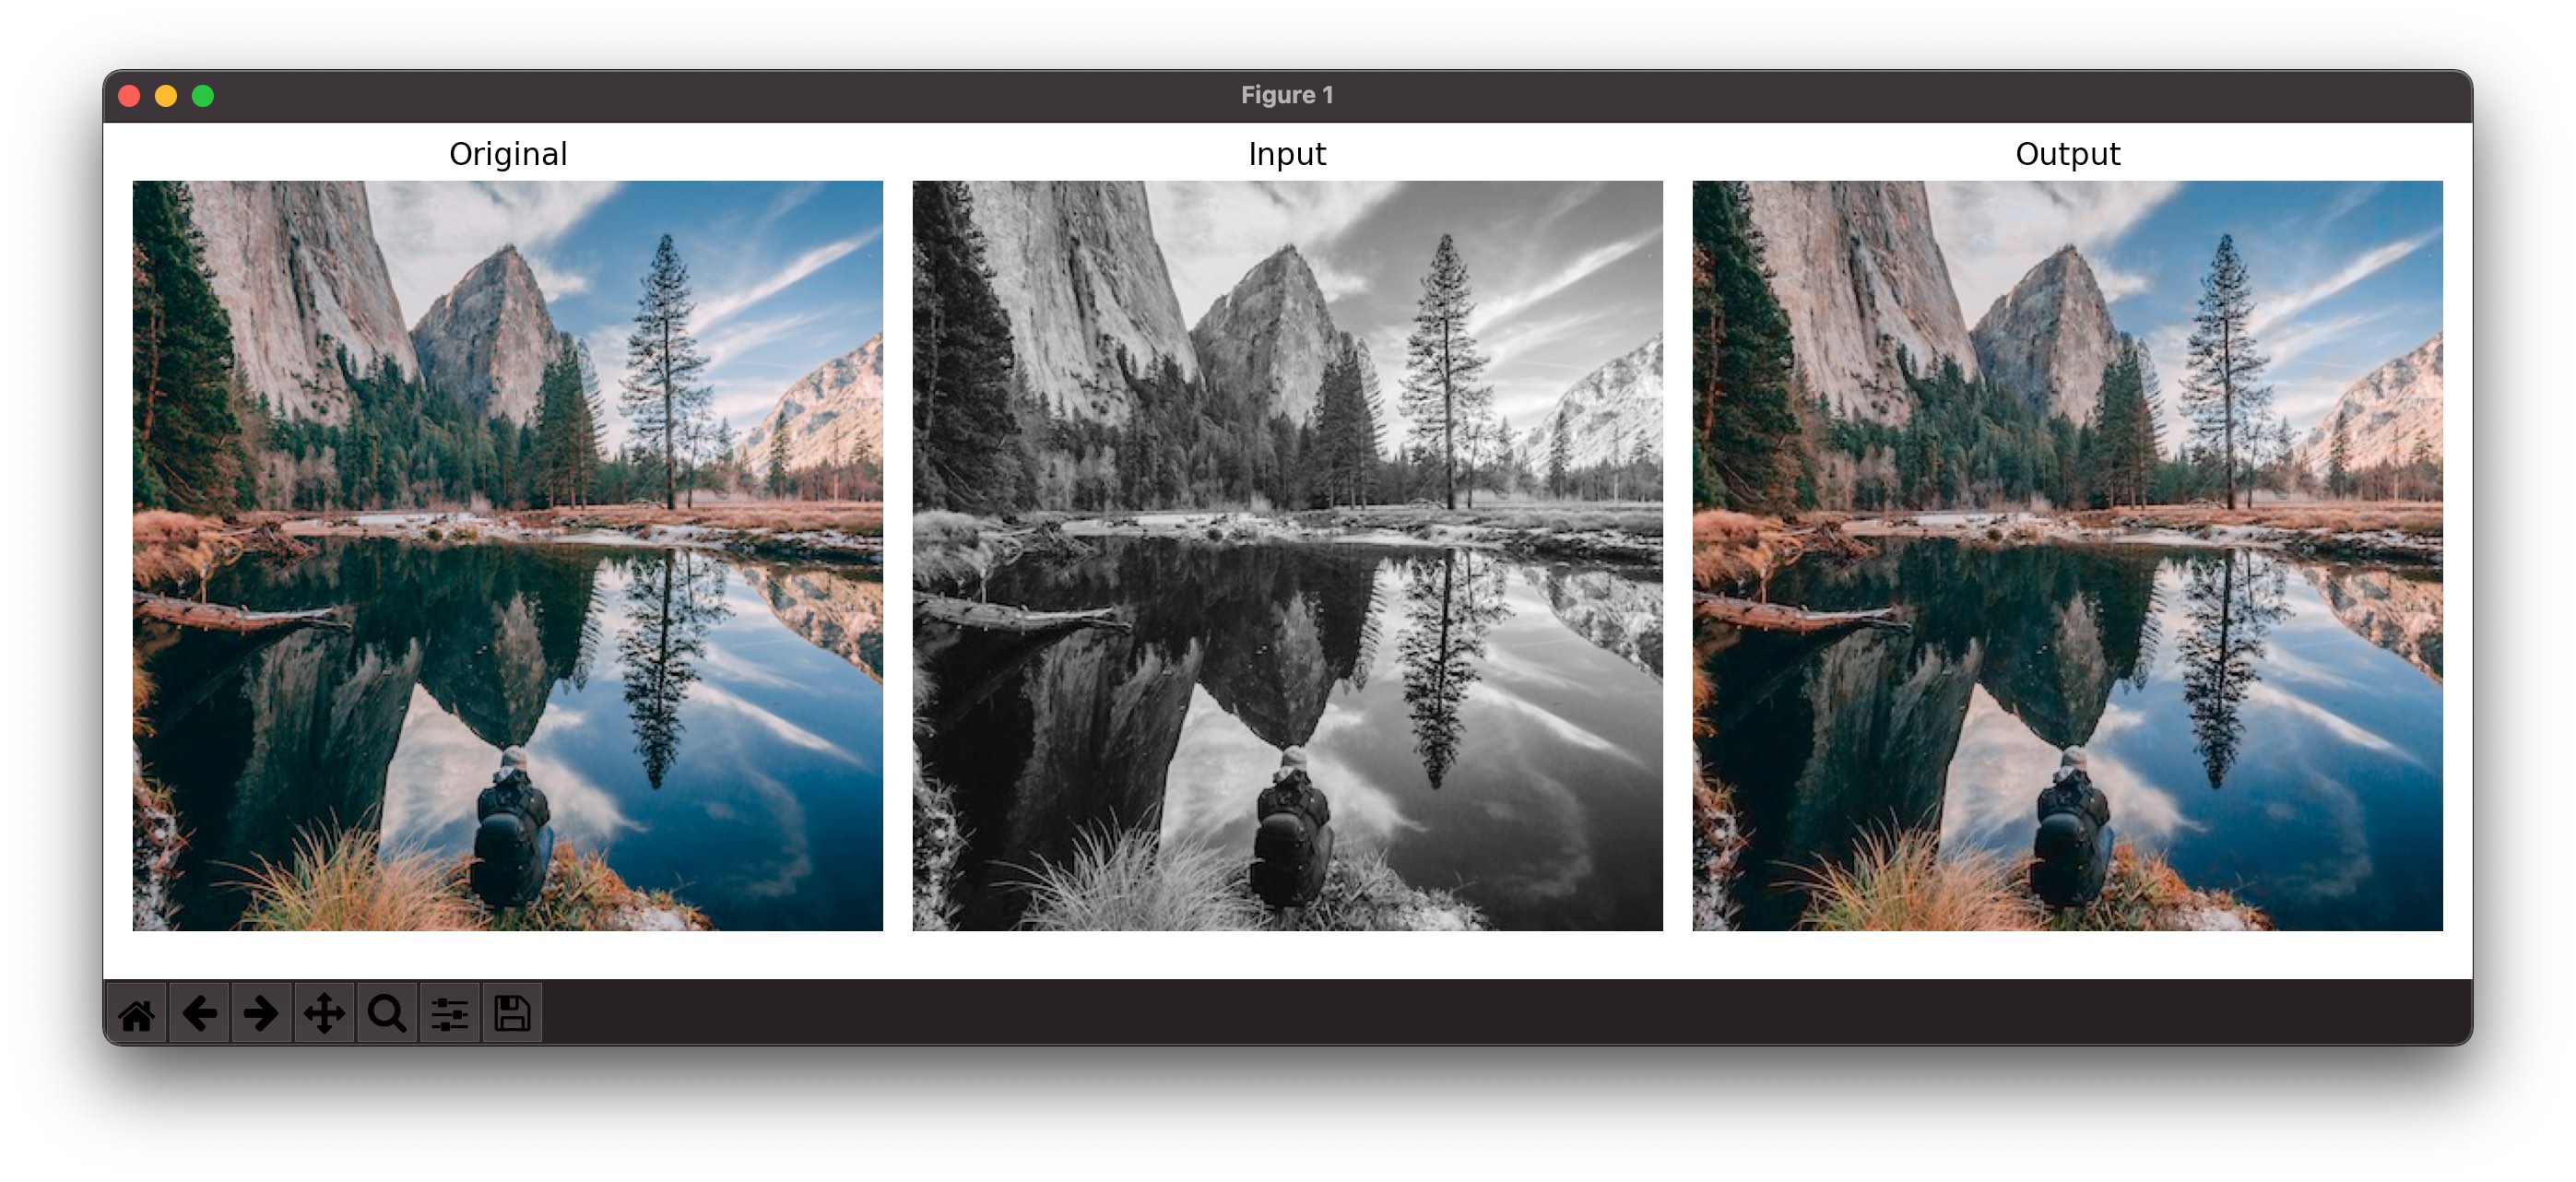
With just a couple of lines of code in Python we converted the pre-trained CNN model to CoreML and colorized an image:
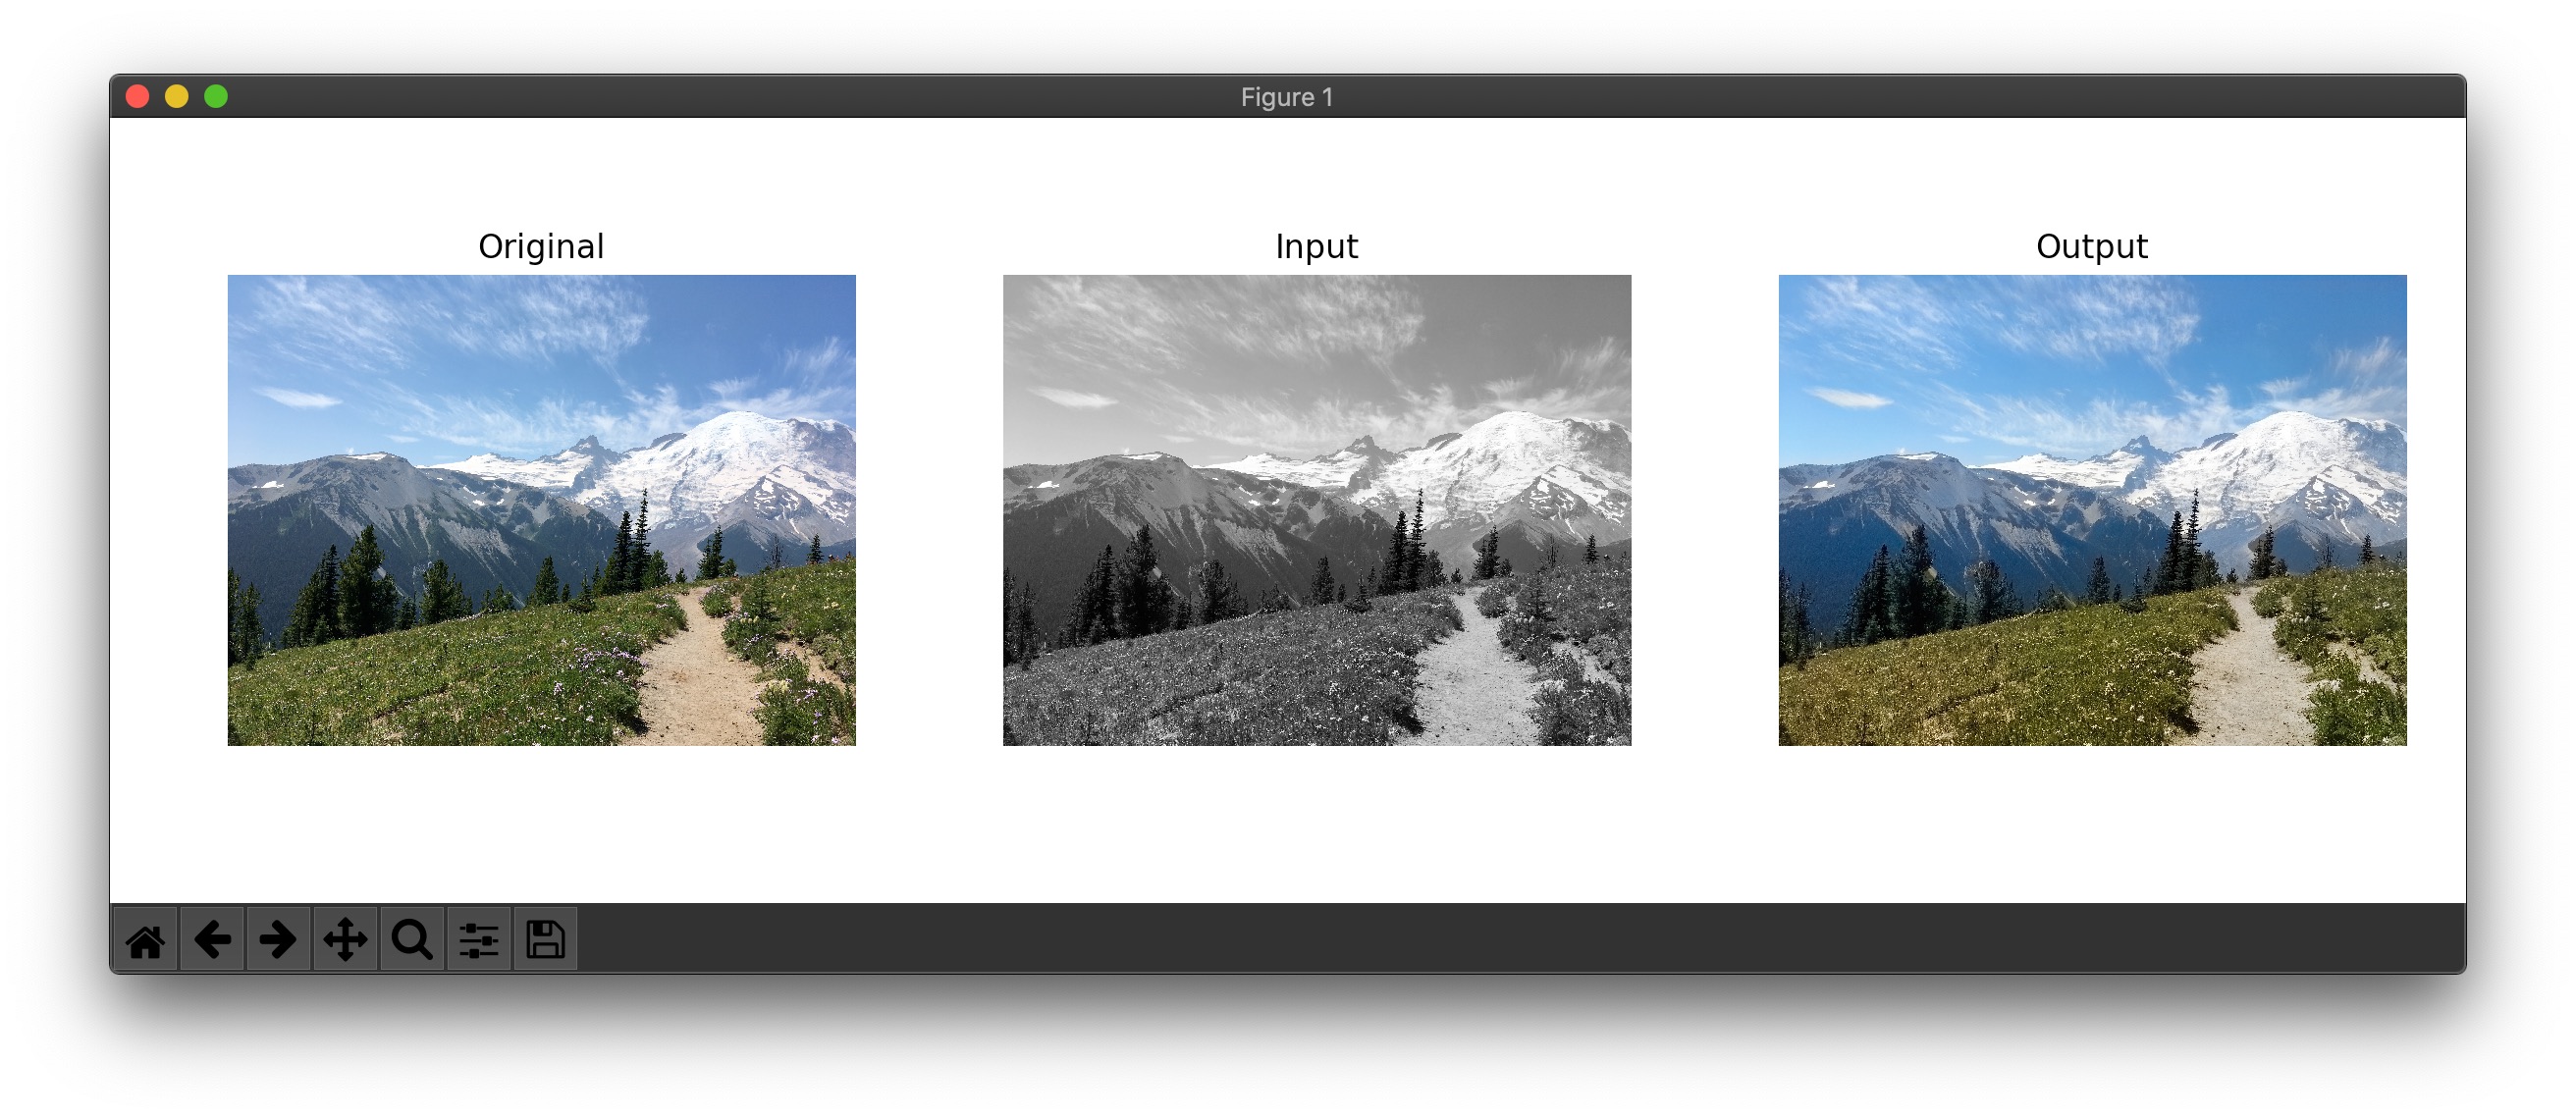
Image colorization application
Let’s utilize the CoreML model mentioned above and create an image colorization application. We can start with creating a new project and adding the CoreML model. From the Xcode you can see information about the model with its inputs and outputs.
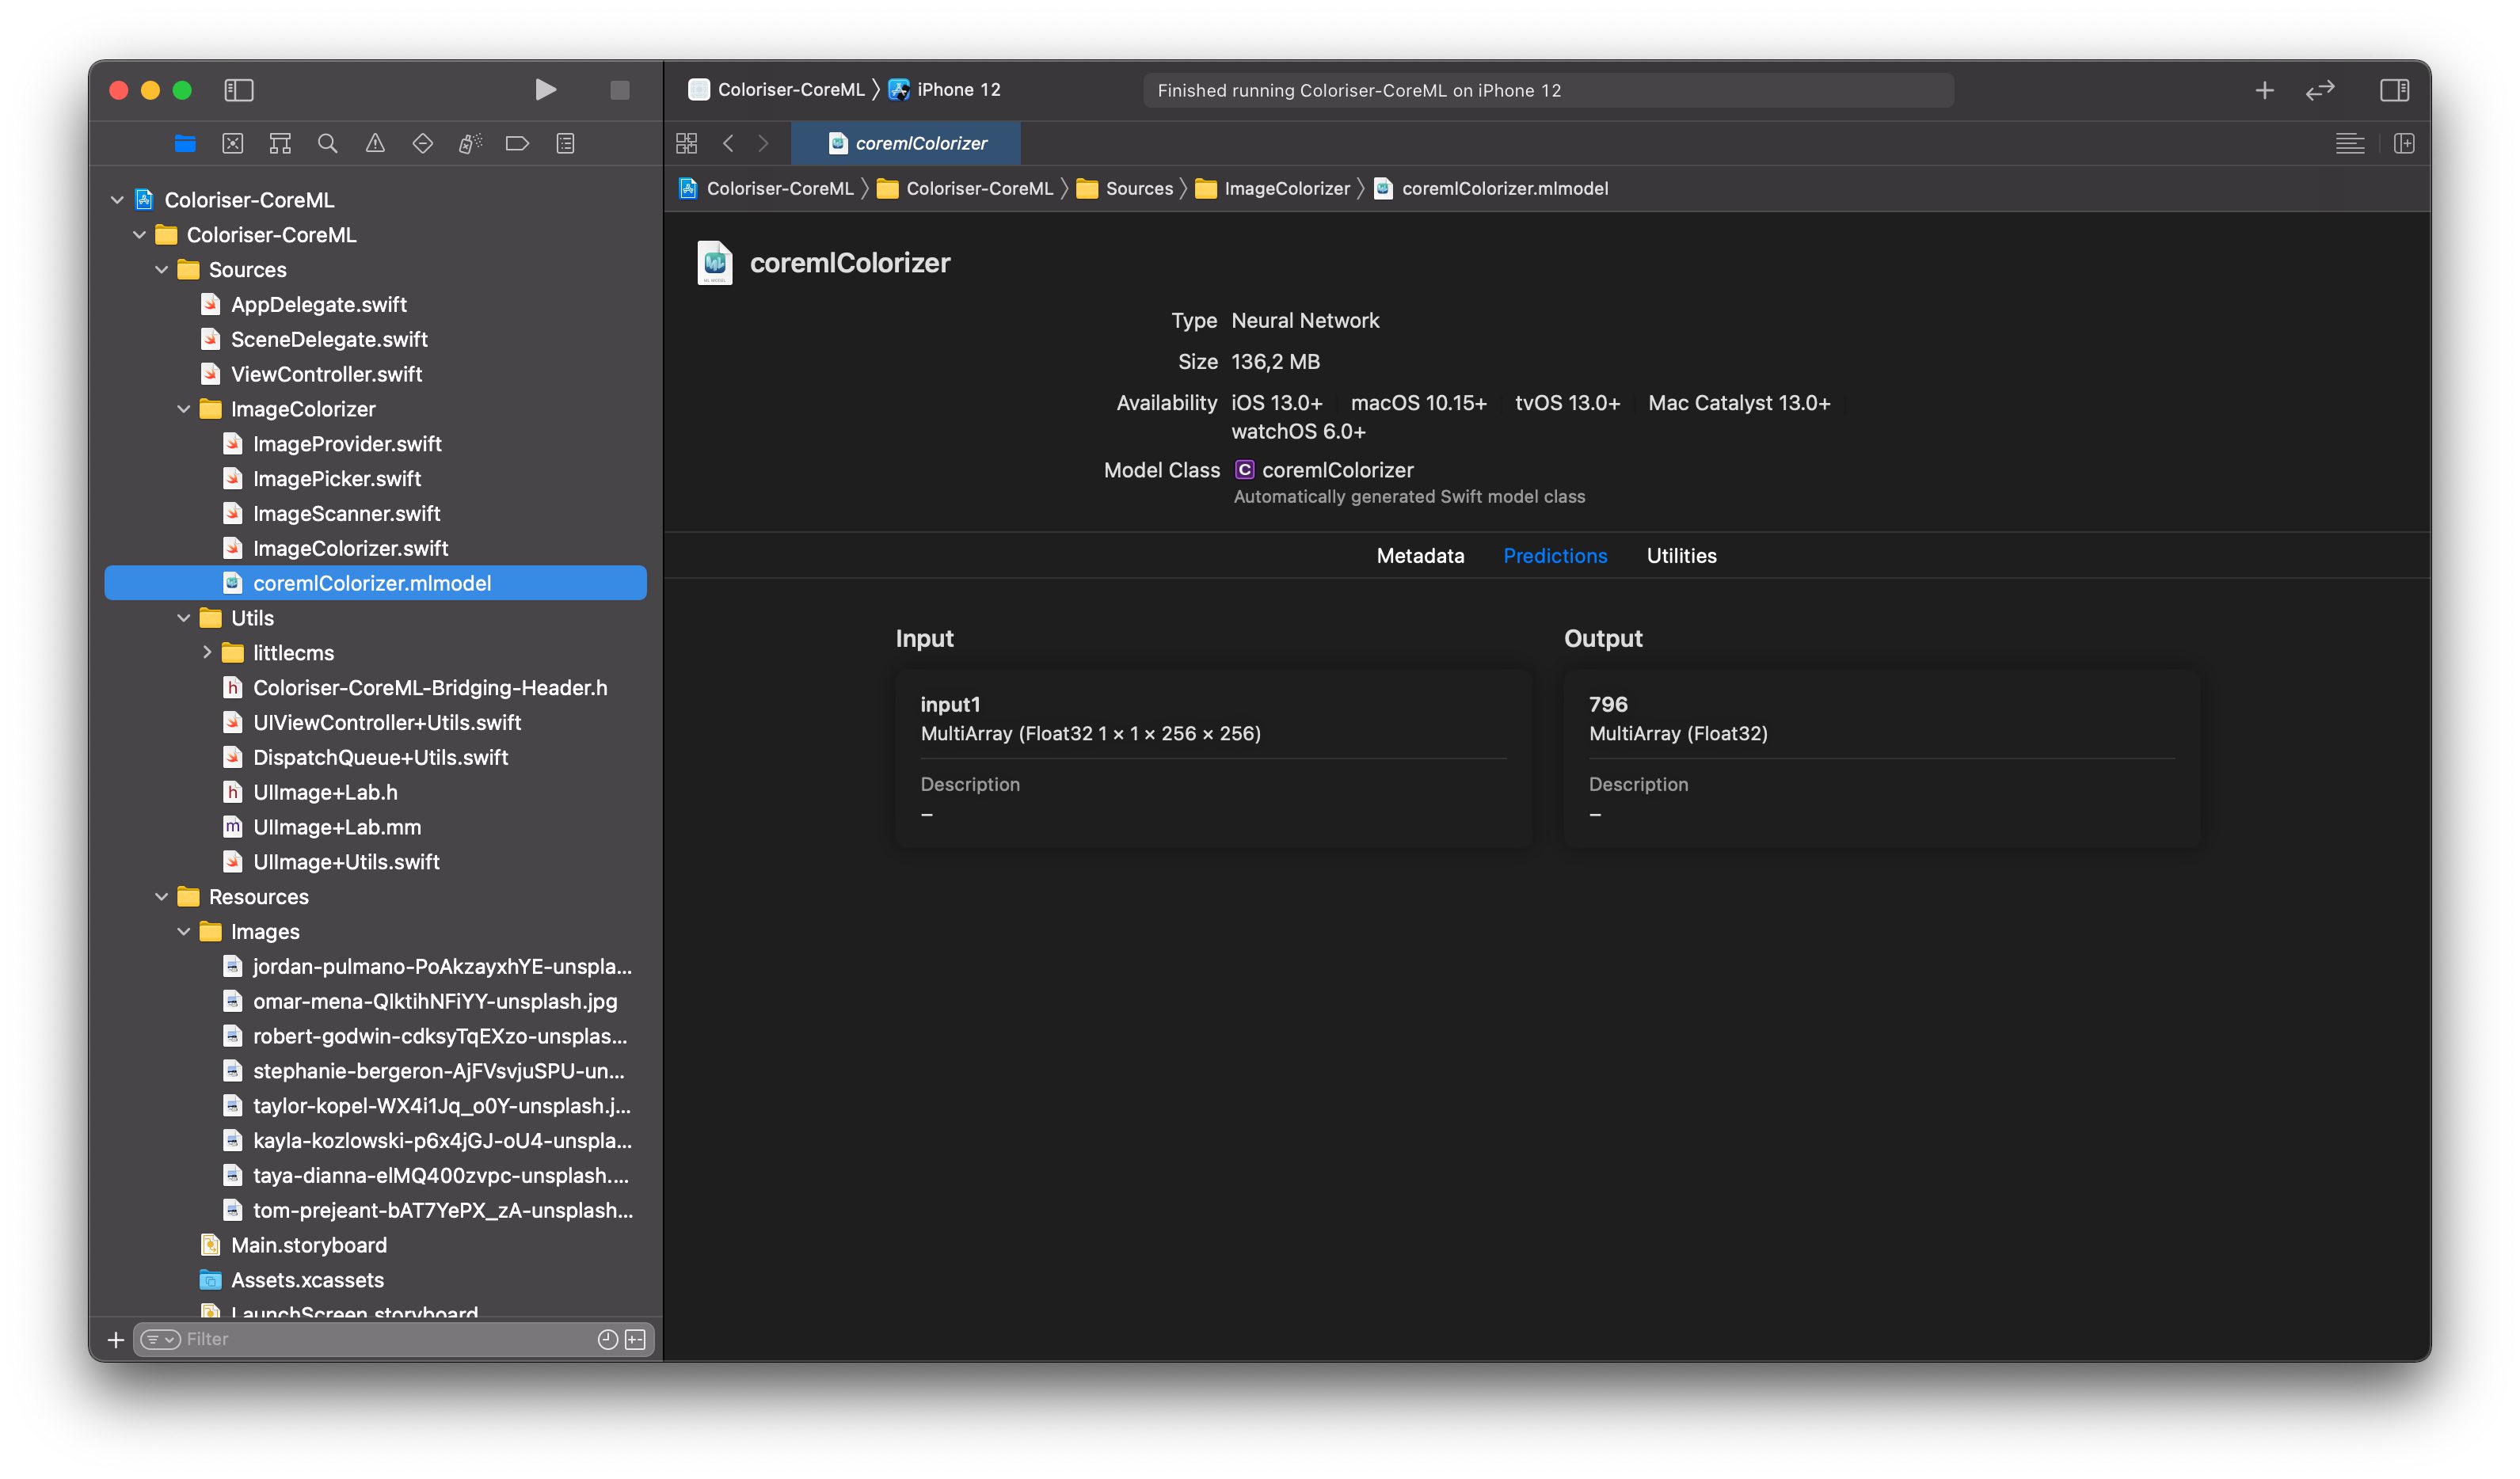
Apart from that, Xcode generates classes to represent our model:
/// Class for model loading and prediction
@available(macOS 10.15, iOS 13.0, tvOS 13.0, watchOS 6.0, *)
class coremlColorizer {
    /**
        Make a prediction using the structured interface

        - parameters:
           - input: the input to the prediction as coremlColorizerInput

        - throws: an NSError object that describes the problem

        - returns: the result of the prediction as coremlColorizerOutput
    */
    func prediction(input: coremlColorizerInput) throws -> coremlColorizerOutput {
        return try self.prediction(input: input, options: MLPredictionOptions())
    }
}
The coremlColorizer class has a prediction function that predicts a and b color layers in Lab from the model’s input - grayscale image in our case.
Let’s move forward and create ImageColorizer class that takes responsibility for image colorization:
final class ImageColorizer {

    func colorize(image inputImage: UIImage, completion: @escaping (Result<UIImage, Error>) -> Void)  {
        DispatchQueue.background.async {
            let result = self.colorize(image: inputImage)
            DispatchQueue.main.async { completion(result) }
        }
    }
}
Next we should implement the colorize function which contains the application’s core business logic:
extension ImageColorizer {
    private func colorize(image inputImage: UIImage) -> Result<UIImage, Error> {
        do {
            let inputImageLab = try preProcess(inputImage: inputImage) // ➊
            let input = try colorizerInput(from: inputImageLab) // ➋
            let output = try coremlColorizer(configuration: MLModelConfiguration()).prediction(input: input) // ➌
            let outputImageLab = imageLab(from: output, inputImageLab: inputImageLab) // ➍
            let resultImage = try postProcess(outputLAB: outputImageLab, inputImage: inputImage) // ➎
            return .success(resultImage)
        } catch {
            return .failure(error)
        }
    }
}
➊ Pre-processes the input, resizes an image to the model’s input size (256x256) and converts one from RGB to LAB color space.
➋ Converts an image Lab color space to the colorizers model input.
➌ Loads colorizer model, makes a prediction and produces an output (a and b color dimensions from the Lab color space).
➍ Creates an image in the Lab color space.
➎ Post-processes the output, resizes the resulting image and creates a UIImage object.
Colorizing a photo taken by Camera
A user can provide images for colorization in two different ways: select one from the photo library or capture it by camera. The first option is quite straightforward and can be easily implemented using PhotoKit. Let’s have a look at how to colorize grayscale photos captured by camera.
First we’ll declare the ImageScanner class that takes responsibility for capturing photos by camera:
final class ImageScanner: NSObject {
    private var completion: Completion?

    func image(with completion: @escaping Completion) {
        guard self.completion == nil, UIImagePickerController.isSourceTypeAvailable(.camera) else {
            completion(.failure(ImageProviderError.startFailure))
            return
        }
        self.completion = completion

        let pickerController = UIImagePickerController()
        pickerController.delegate = self
        pickerController.sourceType = .camera
        UIViewController.topmostViewContoller.present(pickerController, animated: true)
    }
}
Next we should make it conform to the UIImagePickerControllerDelegate protocol and handle result:
extension ImageScanner: UIImagePickerControllerDelegate {

    func imagePickerController(_ picker: UIImagePickerController, didFinishPickingMediaWithInfo info: [UIImagePickerController.InfoKey : Any]) {
        guard let uiImage = info[UIImagePickerController.InfoKey.originalImage] as? UIImage else {
            dismissController(picker, with: .failure(ImageProviderError.internalError))
            return
        }

        DispatchQueue.background.async {
            let result = self.postProcessImage(uiImage)
            self.dismissController(picker, with: result)
        }
    }
}
It is obvious that photos captured by camera can’t be used as an input for our model. Ones should be cropped, have perspective corrected, etc. We can leverage Vision and CoreImage frameworks for these needs. Let’s dive into details and implement the postProcessImage function.
extension ImageScanner {
    private func postProcessImage(_ image: UIImage) -> Result<UIImage, Error> {
        guard let ciImage = CIImage(image: image),
              let orientation = CGImagePropertyOrientation(rawValue: UInt32(image.imageOrientation.rawValue)) else {
            return .failure(ImageProviderError.internalError)
        }
        let inputImage = ciImage.oriented(forExifOrientation: Int32(orientation.rawValue))
        return detectRectangle(on: ciImage, orientation: orientation).flatMap {detectedRectangle in // ➊
            self.cropImage(inputImage, with: detectedRectangle) // ➋
        }
    }
}
➊ Detects a rectangle object on a photo.
➋ Crops and enhances the result.
Vision framework is powered by computer vision algorithms and performs a variety of tasks on input images and video. In our case we are using it to detect a rectangle object - grayscale photo captured by camera.
extension ImageScanner {
    private func detectRectangle(on image: CIImage, orientation: CGImagePropertyOrientation) -> Result<VNRectangleObservation, Error> {
        var result: Result<VNRectangleObservation, Error> = .failure(ImageProviderError.internalError)
        let semaphore = DispatchSemaphore(value: 1) // ➊
        let rectanglesRequest = VNDetectRectanglesRequest { request, error in // ➋
            guard error == nil,
                  let observations = request.results as? [VNRectangleObservation],
                  let detectedRectangle = observations.first else {
                return
            }
            result = .success(detectedRectangle)
            semaphore.signal()
        }
        let handler = VNImageRequestHandler(ciImage: image, orientation: orientation) // ➌
        if (try? handler.perform([rectanglesRequest])) != nil { semaphore.wait() } // ➍
        return result
    }
}
➊ DispatchSemaphore is used to wait for an async request result.
➋ Creates an image analysis request that finds projected rectangular regions in an image.
➌ Declares a handler that is responsible for request processing.
➍ Performs the rectangle detection request and waits for the result.
Next, let’s use CoreImage framework to crop an image and do the perspective correction of it.
extension ImageScanner {
    private func cropImage(_ inputImage: CIImage, with detectedRectangle: VNRectangleObservation) -> Result<UIImage, Error> {
        let imageSize = inputImage.extent.size
        let transform = CGAffineTransform.identity.scaledBy(x: imageSize.width, y: imageSize.height)
        let boundingBox = detectedRectangle.boundingBox.applying(transform)
        guard inputImage.extent.contains(boundingBox) else {
            return .failure(ImageProviderError.internalError)
        }

        let topLeft = detectedRectangle.topLeft.applying(transform)
        let topRight = detectedRectangle.topRight.applying(transform)
        let bottomLeft = detectedRectangle.bottomLeft.applying(transform)
        let bottomRight = detectedRectangle.bottomRight.applying(transform)
        let correctedImage = inputImage.cropped(to: boundingBox)
            .applyingFilter("CIPerspectiveCorrection", parameters: [
                "inputTopLeft": CIVector(cgPoint: topLeft),
                "inputTopRight": CIVector(cgPoint: topRight),
                "inputBottomLeft": CIVector(cgPoint: bottomLeft),
                "inputBottomRight": CIVector(cgPoint: bottomRight)
            ])
            .transformed(by: CGAffineTransform.identity.rotated(by: 90 / 180.0 * CGFloat.pi))

        let imageRef = CIContext().createCGImage(correctedImage, from: correctedImage.extent)!
        return .success(UIImage(cgImage: imageRef))
    }
}
The resulting image should be consumed by ImageColorizer instance we’ve discussed before. Just like that, we’ve created an application that colorizes grayscale images using CoreML.
Challenges
I can’t but mention challenges I came across while working on this project:
Pythonis the most popular language for ML and has a variety of modules and libraries you can use. Unfortunately you can hardly find similar libraries for iOS and frequently you’ll end up implementing ones yourself.- In some cases you might encounter an unsupported operation error while converting a trained model with
coremltools. You can bypass this error by using composite operators that are constructed with existing MIL operations. Please check Get models on device using Core ML Converters WWDC session for more details. - Unfortunately there is no built-in function that converts RGB to Lab color space and vice-versa on iOS. I’ve tried a couple of open-source solutions for RGB <-> Lab conversion but those produced odd results. It took me a while to realize that unlike sRGB, Lab is a device independent color space and some of its colors cannot be represented in sRGB. In this case we need more sophisticated approach and convert between color spaces using Little Color Management System together with ICC-Profile.
- It is hard to find a route cause when issues related to CoreML code arise. A couple of times I’ve been getting implausible results because the model’s input was not provided in the right way. I’d suggest following the approach from this article and building a proof of concept using Python first. This should help you later on with finding & fixing issues in the iOS project, verifying the model’s output for correctness, etc.
Conclusion
In this article we’ve built an application that colorizes grayscale image using CoreML, Vision and CoreImage frameworks. We also learned how to convert a custom machine learning model to Core ML format using coremltools and run it entirely on-device.
You can find the source code of everything described in this blog post on Github. Feel free to play around and reach me out on Twitter if you have any questions, suggestions or feedback.
Thanks for reading!